No products in the cart
Gen 3: Blank Controller Display
If the display on the Gen 3/3+ controller is blank, and you are certain there is power to the outlet, either the fuse protecting the controller has blown due to a power surge, or a component in the misting unit is shorted, or the controller has otherwise failed. A shorted system component may cause the display backlight to light up, but no characters will show on the display.
Time: 5 – 10 mins
Tools:
- multi-meter to test presence of voltage at electrical outlet
- Phillips head screwdriver (depending on age of unit)
Parts: none
1. Confirm there is suitable AC electrical voltage at the outlet.
Use a multi-meter (or another appliance you know to be working) to test whether there is suitable voltage at the outlet.
2. Confirm whether the power loss is caused by an electrical short in a unit component.
A. Remove screws or thumbscrews securing controller into Gen 3 plastic shroud.
B. Disconnect all cables from the back of the controller.
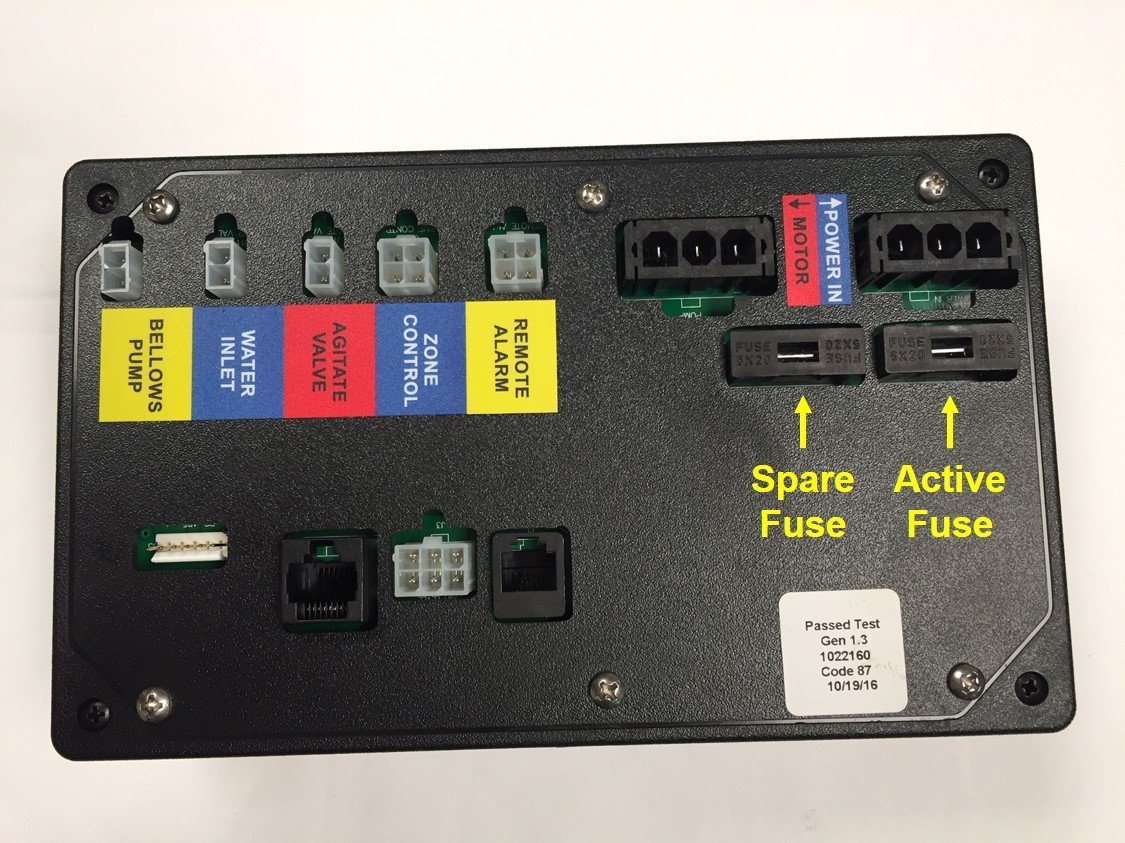
C. Connect the power cable only to the controller (connector labeled “Power In”, cable has a blue dot on the connector.)
D. If the controller boots up with only the power cable attached, a system component has shorted out. If it does not boot up, go to Step 3.
- To determine the shorted component, plug all cables back into the controller one at a time.
- After plugging in each cable, confirm controller power still on. If controller display goes blank, or completely loses power, the last device plugged in is the culprit. (It typically will be a remote receiver, remote receiver cable or iMistAway module.)
3. Confirm whether the power loss is caused by a blown fuse.

A. Disconnect all cables from the back of the controller.
B. The fuse over the connector labeled “Motor” is a spare. Pull it out of its port and visually inspect to ensure the fuse is still intact and no evidence of black marks, i.e., confirm it had not been previously swapped.
C. Pull the active fuse out of its port, above the connector labeled “Power In” and replace it with the spare fuse.
D. Reconnect the power cable only to the connector labeled “Power In.”
- If the controller still does not boot up with a new fuse and only the power cable connected, the controller must be replaced.
- If the controller does boot up, determine the reason for the blown fuse in Step 4.
4. Determine reason for blown fuse.
A. Plug in only the water inlet solenoid. In MAINTENANCE menu, execute WINT function to energize water inlet solenoid. If fuse blows, replace water inlet solenoid.
B. Plug 6 pin connector back into controller.
C. Plug in the bellows pump. On MAINTENANCE menu, execute CHG function to activate bellows pump. (If CHG not in menu, navigate to INS and simultaneously hold down MENU, RIGHT arrow and DOWN arrow simultaneously for 5 seconds.) If fuse blows, replace dosing pump.
D. Plug in the agitation valve. On MAINTENANCE menu, execute an INSPECT (or INS1 if zoned) cycle. Unit may need to fill with water before agitation valve is energized. Confirm fuse does not blow when countdown begins. If fuse blows, replace agitation valve.
E. Plug in MOTOR cable. Ensure agitation valve is still connected. Execute INSPECT (or INS1 if zoned) from the MAINTENANCE menu. If fuse blows after countdown begins, inspect motor cable for chafed wires, particularly at connection to motor. If cable is OK, replace the motor.
F. If unit is equipped with a zone kit, plug in zone kit cable, and execute INSPECT ZONE2 (INS 2 from the MAINTENANCE menu). If fuse blows after countdown begins, replace zone kit.
G. If the fuse does not blow when running INSPECT with the agitation valve, motor and zone kit (if equipped) connected to the controller, the fuse likely blew due to an electrical power surge. Unit should operate normally with the new fuse.
Note: If the spare fuse blew while troubleshooting, you will need to purchase new fuses. It is not a standard fuse, so purchase it from MistAway, part #10939.

