No products in the cart

Gen 3: Spring Startup Checklist
1. Connect power and water supply line to unit
- Plug unit into GFCI outlet
- Inspect inline water filter element and replace (or clean) element if necessary
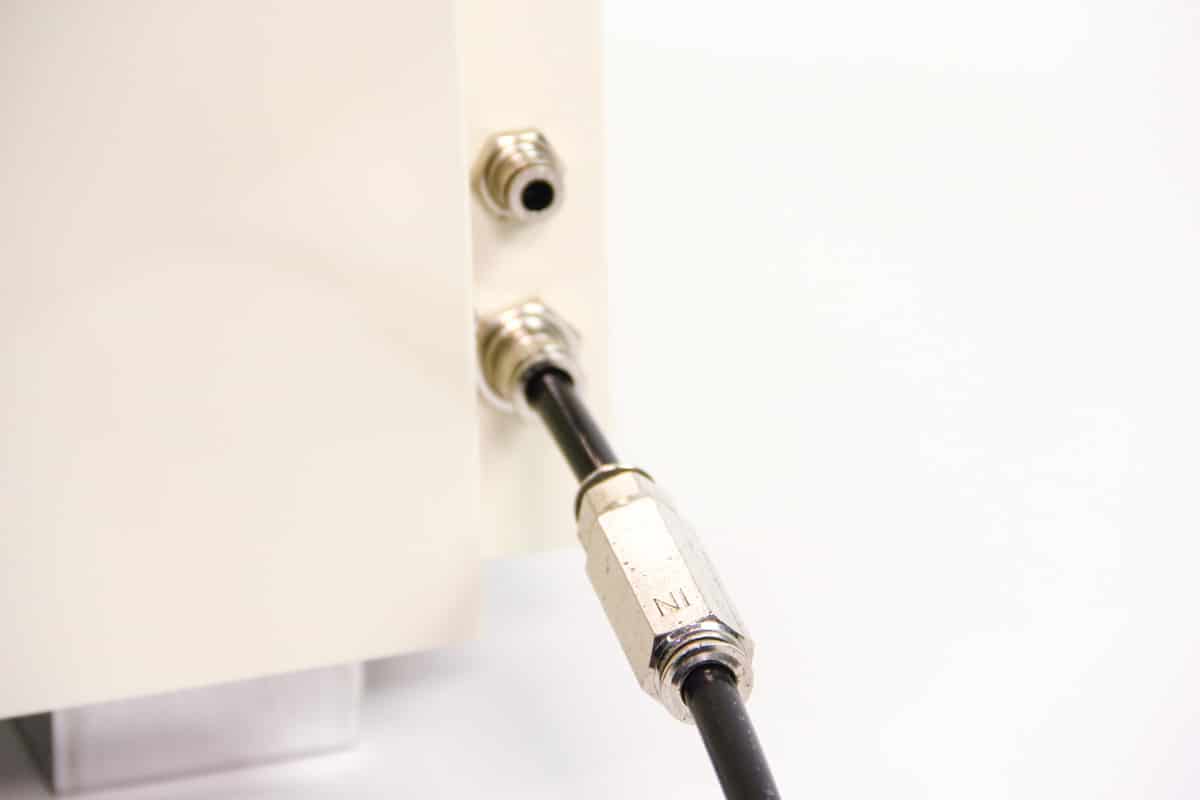
- Run water to flush supply line before connecting to filter inlet (marked “IN”)
- When supply line is secure, open faucet
2. Run INSpection cycle and check components in fresh water system. Confirm pump pressure
- Remove bottle and reposition controller and shroud. See Gen 3: Access Components by Repositioning Shroud
- Remove any foreign material in batch tank.
- Run INSpect cycle: Maintenance Menu, use ▲ or ▼ to scroll to INS; Push and hold Green ► for 5 seconds; Unit will fill and mist for 5 minutes or until stopped.
- Confirm no leaks in inlet solenoid, flow meter or flow regulator.
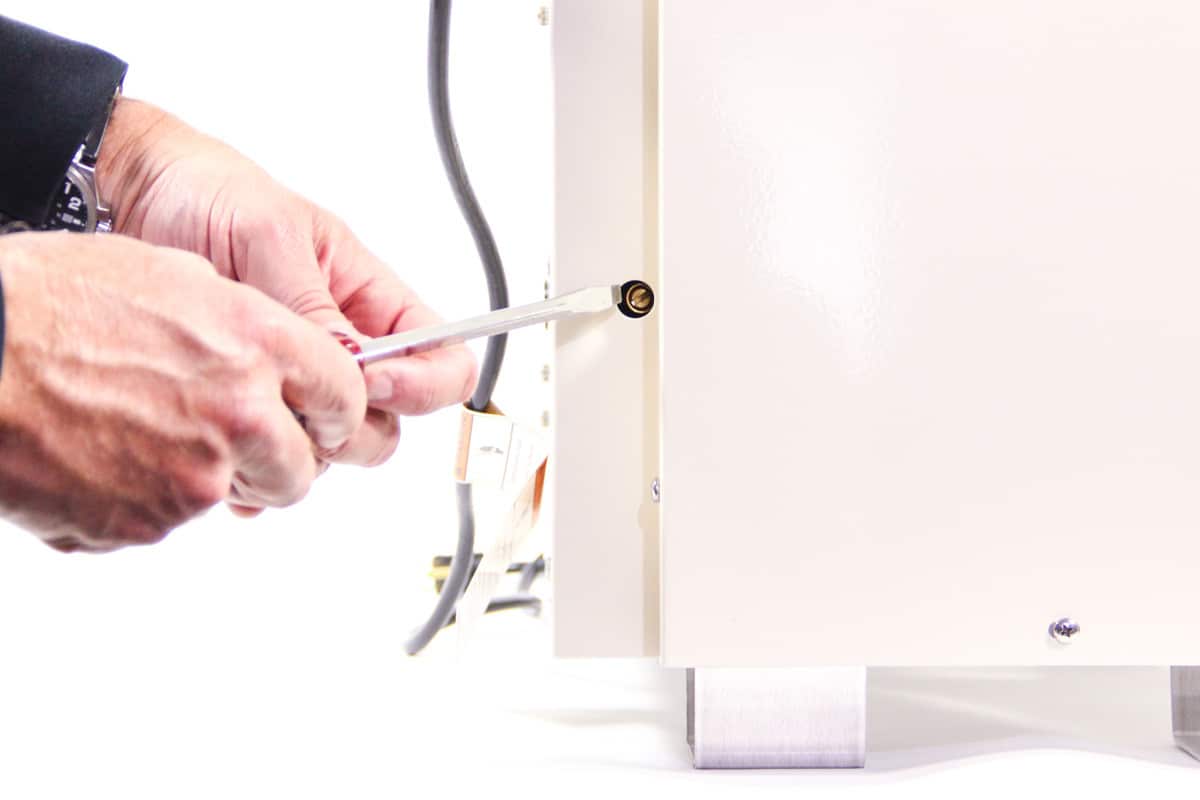
- Confirm pump pressure is 250 psi (on smallest zone). If necessary, adjust pump pressure at screw in port located at left rear corner of unit. Use a flathead screwdriver, turning clockwise to increase pressure and counter clockwise to reduce pressure.
- Stop INSpect and return shroud and controller to operating position (but don’t replace controller hand screws yet)
- Return shroud and controller to original position.
3. Inspect element in nozzle circuit filter and replace if necessary.
4. Inspect nozzle circuit for max flow and leaks
- Run Inspect (INS from Maintenance Menu)
- Confirm all nozzles spraying properly and that mist is clear of landscaping.
- Replace tips on nozzles that are not spraying properly. (Target is 40 ml/min)
- Press red MENU/STOP button to stop INSpect routine.
- If system is zoned, perform for both zones.
5. Check Nozzle Circuit and Treated Area
- No plant burn
- No staining fence, decks or siding
- Tubing and transition protection is in good shape
- Inspect and adjust tree clamps and nozzles
- Inspect for conducive breeding conditions
6. Prepare Insecticide Bottle and Insert into Coupler
- Remove factory cap and seal from pour port.
- Thread Plus Cap onto pour port, ensuring it is not cross-threaded or too tight.
- Remove seal on vent port (to prevent bottle from collapsing as insecticide is pumped out.)
- Replace factory cap on vent port but do not tighten completely.
- Insert bottle into coupler. (Pressing button on coupler will free bottle for removal.)
7. Set Dose Settings
- MAINTENANCE Menu, scroll to REFILL.
- Press and hold Green ► button for 5 secs to enter REFILL routine.
- Calculate desired MIX ratio using the Dosing and Days to Empty Calculator
- Set MIX ratio (parts water to 1 part concentrate) to target. Default is 108:1. Press Green ► button to advance.
- Set bottle size (BOT) in ounces. Default is 64 oz. Range is 2 to 256 ounces. Press Green ► button to advance.
- Set LEVEL in bottle. Eight bars indicates a full bottle of the size entered in the previous step. Press Green ► button to advance.
- DONE, and then VENT will be displayed. Press Green ► button to return to home screen.
8. Run Charge (CHG) and check bellows pump.
- See Gen 3: Confirm Bellows Pump is Pumping
- Once flow is confirmed, STOP the CHG
- Return controller to operating position and replace hand screws.
9. Charge Insecticide
- MAINTENANCE Menu, scroll to CHG.
- Press and hold Green ► button for 3 seconds.
- DOSE will flash for an extended period and unit will bring batch tank of fresh water to target concentration.
10. Confirm Day/Time and Mist Cycles
- DAY/TIME Menu; Set Day and Time. (note AM and PM); Exit by pressing Menu button.
- CYCLES Menu; Blinking C# identifies each automatic mist cycle with current mist duration and mist time; Set mist duration and time (note AM/PM)
11. Set System Mode
- With the display showing day, time and level, press Green ► button to position the ▲ at top of display pointing to active System Mode.
- OFF – daily agitation cycle only
- ON – remote and manual, but no programmed mist
- AUTO Everyday – mist schedule runs daily. This is the most common System Mode.
- AUTO Custom – mist program run on days configured in CUSTOM PGM
12. Close Lid
- Confirm System Mode is set as desired. AUTO Everyday is the most common mode.
- Close lid
- Lock if desired (and secure key in a safe location.)